social

Facebook Twitter Blogger Pinterest Instagram YouTube

menu

About Us Contact Us News Faq Tutorials Our Shop

giveaways ad

Monday, June 30, 2014

Guest Tutorial: A Matching Party Hat

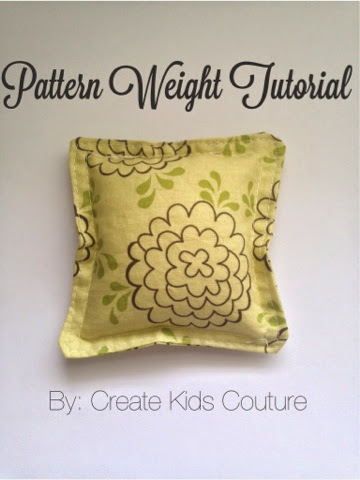
Hello everyone!  Kristen has asked me to share an easy peasy tutorial with you for a birthday hat. It pairs perfectly with Conner's Diaper Cover Set for cake smash pics!


Supplies:
  • scrap fabric
  • paper party hat (you can pick up a pack of 6 for a dollar)
  • glue   (permanent glue stick, hot glue, spray adhesive, craft glue-I think you know the direction           I am going with this..if you are a crafter you have several types of glue. :) 
  • scissors 
  • marking pen
Optional:
  • trim (ric rac, lace, etc)
  • pom-pom for the top of the hat


After gathering your supplies you are ready to make a super cute party hat in about 15 minutes! Well, more or less. :)
 

 Carefully take apart the hat where it is joined together. If you accidentally tear it you can put it back together with adhesive tape. Then, lay the unfastened hat down on the wrong side of the fabric. You will trace the hat outline onto the wrong side of the fabric with the marking pen. Gently fasten the hat back together.

Next, cut out the fabric hat piece.You can use either pinking shears or fray check if you do not want the fabric to fray.


Use spray adhesive or a permanent glue stick to adhere the fabric to the hat.

You have now completed your party hat UNLESS you want the extra touches like I do!
 

I used my cool glue gun to adhere the ric rac to the bottom of the hat. 

So are you still wondering what the blue thingy is in the first pic?...lol.....it is a pom pom maker from Clover! You can use store bought pom poms for the top or make your own. These are so fast and easy! Great directions for making the pom poms are on the packaging. After you have your pom pom, get your glue of choice out. Place a small amount of glue on top of the hat and place the pom pom on top!

Now your little one is ready to party!

Please feel free to email me at cranberryridgedesign@gmail.com with any questions!

Thanks Kristen for the opportunity to share an easy, peasy tutorial with your readers!

Connie


Wednesday, June 25, 2014

Serging 101: Making a Lettuce Edge on Knits

It's time for another episode in our Serging 101 series!  Last time we learned how to do rolled hems with our serger. Now we're going to take it one step farther and add a little extra flair when we do rolled hems on knits. It's time to learn lettuce edging! It's so pretty and so easy to do.  


The first thing we need to do is set our machine to the the same settings we use on a regular rolled hem. For the Brother 1034D we suggest using 4 for the right needle, 5 for the upperlooper, and 7 for the lowerlooper.
(We don't use the left needle at all, so ignore the yellow dial above.)  The side settings should both be on "R". If you need a little extra help on how to thread for a rolled hem, you can read our beginner tips by following the link. 


Start off by lowering the foot and beginning a chain. 


Then put the knit edge under the foot and begin the rolled hem. Now the big trick for creating a lettuce edge is that we need to stretch the fabric on both sides of the foot as we go. In the picture above you can see that the fabric is being stretched in front and in back.  


As we roll hem, the stitching automatically comes off as a ruffled lettuce edge. It really is that simple!  Be sure that as you do the hem, you stretch evenly as you do the whole outfit so the lettuce edging will be consistent. 


It's such a pretty option to add to the edges of knit skirts, bloomers, sleeves, and a variety of girly outfits. And it's so easy! 

We can't wait to see what you make using a lettuce edge with your serger.

Here is a quick video that Shannon made showing how easy it is to do a lettuce edge on a serger.


Let's Create! ~ Kristen 

Tuesday, June 24, 2014

How to Tuesday: Pattern Weights

I can't tell you how many times I have been working on a project and thought to myself, "I need more hands!" While I haven't yet figured out how to make that happen, I have discovered a few little tricks that help with the juggling. One of these is to use pattern weights. If you haven't used them before, you will love them! And if you already love them then today's tutorial is perfect because we're going to teach you how to make your own pattern weights. Here's Morgan! 


To get started you will need about a cup of rice and two 5"x 5" scraps of fabric. 


With our fabric pieces right sides together we sew along all 4 edges, making sure to leave a 1" gap. 


After turning it right side out and pressing, we will topstitch along all four sides and again leave a 1" gap in the same place. 


We will repeat the above step but this time we will sew 1/4" below the top stitch. 


Using a funnel, pour your rice into the weight. Do not pack it full! You want to leave some space for the rice to move around. 


Pushing the rice to the sides, we will sew the opening closed.  


And just like that, you're done! 


Simply lay the weight down wherever it seems most useful to you. (We're starting to cut out a William's vest as you can see). A pattern weight means less hassle, less pinning, and less juggling. Sounds good to me.

Let's Create! ~ Kristen 

Monday, June 23, 2014

Monthly Mashup: Harper's and Demi's


We have so many cute patterns available at CKC and I love seeing all the ways that our fans mix and match patterns to create something new. This is one reason why I love our Monthly Mash-up so much!  Deborah Koch from Ma Cherie Kids has made another gorgeous mash-up for us this month and I know you're going to love it.     

The two patterns that Deborah chose to match up are Harper's Pillowcase Dress... 


Both are so pretty!  And look what Deborah came up with by combining the two: 


Isn't it perfect for summer?  Fun and simple, combined with ruffled and twirly!  Let's take a closer look at how she combined the two patterns: 


 Deborah used the top of the Harper's dress by keeping the bodice length as written.  She took 2" off the bodice width so it would be a little more fitted. I love the pretty bow tied on her shoulder! 


Then Deborah added the skirt of Demi's without any changes made to the pattern. It's so full and ruffled - perfect for twirling!


Here it is all put together!  It's pretty clear that her daughter loves it!  Deborah got her fabrics from Joann's, Hobby Lobby, and Michael Miller.  The beautiful headband came from Ma Cherie Kids


Thank you to Deborah for another fabulous mash-up! 

I always look forward to these mash-ups because Deborah manages to keep her looks fresh and unique for each season. I find her ideas inspiring and I hope you do too!  I'm off to make a mash-up of my own.

Let's Create! ~ Kristen 

Thursday, June 19, 2014

Adding Buttons to Romper Straps

Rayna's Retro Romper is a favorite for summertime, and did you know that we just upsized Rayna's to Tweens?! It's so cute on older girls too! 


One of my favorite features about Rayna's is the adorable straps in back. They are so cute on their own or layered over a tee. We have heard concerns from some moms, though, that their daughters might not be able to tie those super cute straps on by themselves in back. (My daughter can, but we also have long arms in our family!) It's not a big deal to get help with tying at home, but Mom or Sister won't always be around to help at school or play when the need arises!


Well, I'm excited to say that we have a fun solution for tweens that can't tie the back straps by themselves! On the blog today we have one of our fabulous Tween testers here to show us how to add buttons to the front of romper straps so tweens can fasten and unfasten their Rayna's in a flash! Jessica Simmons is here from RoxieRoo2 to show us how it's done, using these simple changes to the pattern:


Change #1: When you cut the fabric for the shoulder straps, add 2" to the length to accommodate the extra room for the button.


Change #2: On Step 14 you need to sew down one long side and down one short side so that the strap is finished on three sides. Turn the strap right side out and top stitch around all three sides. (Only one side will be left with raw edges.)

Change #3: Skip Step 24 because we will not be attaching the straps to the bodice.


Change #4: When you get to Step 29, top stitch like the pattern says. Once you are done top stitching, figure out where the strap placement should be, based off the pattern piece. Using it as a guide, measure 1/2" down from the finished top edge of the bodice and mark a line for a 1" button hole.  See the blue marks in the photo above. Repeat the marks on the other side of the bodice.


Sew the two vertical button holes, as shown above.


Take the two shoulder straps and measure 1" from the finished edge and mark a dot. This will be the center of your button placement.  


If you choose, before sewing the button you can pleat the shoulder strap and tack in place where the button will be sewn on (so no one will see the tack under the button). This will give the same pleated look as the regular Rayna straps.


Sew a button of your choice onto each strap.

You have now added button shoulder straps to your romper!


Thank you so much to Jessica for her clever adjustment and helpful tutorial today! l. If you have a moment, please go show Jessica some appreciation over on her RoxieRoo2 page here! She has some really cute stuff to share.
Another great thing about Jessica's tutorial today is that this technique will also work with several other patterns as well. Our kids love being able to get in and out of their clothes themselves, so why not make it easy on them while still being stylish?
Let's Create! ~ Kristen

Wednesday, June 18, 2014

Binding a Quilt


Have you had a chance to check out our new quilt pattern at CKC, Barbara's Bedruffle Quilt Top?  It's so gorgeous and all those ruffles will be worth the time and effort you put into it!

Once you get your quilt top sewn, you will be ready to finish and bind your quilt.  On Tuesday we showed you how to "finish" your quilt with the batting and backing. And now today we're going to show you how to "bind" your quilt!  


The quilt binding will secure all the edges and add a pretty border to your quilt. There are several ways it can be done and our PDF instructions will show you one of our favorite methods. With our easy calculations and step-by-step photos there won't be any guesswork involved even if this is your first quilt! 


Now that you know what you're getting, you can download our free


Please share your finished quilt photos with us in the CKC patterns group, and keep an eye out for more quilt top patterns and accessories coming soon! 

Let's Create! ~ Kristen 

Tuesday, June 17, 2014

How To Tuesday: Checkbook Cover

Awhile back I went to a make-and-take craft activity where we were learning how to make cute checkbook covers out of scrapbook paper. It was a pretty simple concept and mine turned out really fun. But later when I decided I wanted to make more checkbook covers as gifts for family members, I realized that I couldn't because I didn't have those neat little plastic covers that are required to make them! Augh. There's nothing worse than feeling the creativity but not having the supplies!  And that's why today's how-to is so fabulous.  You are going to learn how to make a completely functional checkbook cover using nothing more than scraps that you probably already have in your stash! 

Here's Morgan with today's tutorial: 


To start you will need two scraps of fabric that are 7" x 13" and one piece of fusible interfacing the same size. 


After fusing your interfacing to the back of one of your scraps, you will lay the fabrics right sides together and sew along all four edges, using a 1/4" seam allowance, making sure to leave a 1" gap. 


Next you will flip the cover right side out and press. After pressing you will top stitch 1/4" from the edge on both short sides as shown in red.


Next you will fold and press both ends in 2.5" and pin in place. You will then again sew down both short ends as shown in red. 


And just like that, you're finished! 

Happy Sewing Y'all!  Morgan

Monday, June 16, 2014

Finishing a Quilt

It's quilt time at CKC!  We have now released our first quilt top pattern and it's gorgeous! You can read all about Barbara's Bedruffles Quilt Top here


If you're new to the quilting world, no problem! We make the instructions very easy for you to follow. You also may not be aware that it is very common for a quilt pattern to come with instructions for the quilt top only.  The finishing and binding is up to you.  But we want to make it easy on you to get your beautiful quilts completed and on your beds, so here on the CKC blog we're providing finishing and binding instructions for all of our quilt tops!  

So basically, you will first sew the quilt top. You will purchase the pattern for that. 

Then you will "finish" the quilt. That is what we're covering today with our downloadable PDF.  

Finally, you will "bind" the quilt. You can learn how to do that on this blog post.   

And then you'll have a gorgeous new quilt to display!  And guess what - we also have patterns in the works for accessories to match your CKC quilt tops. Pillows and curtains, etc.  Amazing!! 


Alright so let's talk about quilt finishing!


Essentially, finishing the quilt means putting together the layers. We need to know how to make our batting and backing the right sizes for the quilts we're constructing. It may sound simple enough, but keep in mind that most quilts are wider than the 42" width of fabric that we buy. Our instructions will be a huge help with this step and it will be no problem at all for you. We'll show you how much to buy and how to construct the backing so the seams are in the right places. 


Our photo instructions will make it all really easy. It's what you've come to love about sewing with CKC patterns - now in quilts!  


Now that you know what you're getting, you can download our free


If you have any questions along the way, please ask! We would love to help you out in our patterns group on Facebook. 

Let's Create! ~ Kristen